

Хотите установить и настроить OpenVPN? Мы расскажем о том, как установить бесплатный сервер VPN (виртуальную частную сеть) на Ubuntu / Debian / CentOS Linux для удаленного доступа сотрудников. А так же для защиты Вашей активности в интернете от злоумышленников при открытом Wi-Fi либо другом незащищенном интернет-соединении.
OpenVPN — это бесплатное и общедоступное программное обеспечение для систем типа Linux / Unix. С его помощью осуществляется двух- или трехуровневая OSI-защита сетевого подключения на основе протокола SSL / TLS.
VPN позволяет создавать защищенные соединения в незащищенных общественных сетях, таких как сеть Wi-Fi — в аэропорту, кафе или отеле. Виртуальной частной сети также необходим доступ к Вашему серверу — корпоративному либо домашнему. С помощью данного инструмента Вы можете обойти сайты с защитой по геолокации, повысить Вашу приватность и безопасность в интернете.
Содержание:
- Установка и настройка сервера OpenVPN
- Выводы
Установка и настройка сервера OpenVPN
Это руководство содержит в себе пошаговые инструкции для того, чтобы настроить OpenVPN сервер на Ubuntu / Debian / CentOS (включая настройки межсетевого экрана ufw / iptables). Для достижения желаемого результата Вам нужно будет сделать следующее:
- Найти и записать свой публичный IP-адрес.
- Установить скрипт openvpn-install.sh.
- Запустить openvpn-install.sh для установки сервера OpenVPN.
- Подключиться к OpenVPN серверу, используя клиент для IOS / Android / Linux / Windows.
- Убедиться в работоспособности VPN-сети.
Давайте же поскорее приступим к первому шагу!
Шаг 1 — находим Ваш публичный IP-адрес
Используйте любую из приведенных ниже команд для определения Вашего публичного IPv4-адреса. Если Ваш интерфейс назван eth0 или eth1 — введите:

Или:
Также можно использовать команды host или dig, как это показано ниже:
Или:
Пример вывода:

Запишите публичный IP-адрес 138.68.110.10, то есть публичный адрес Вашего сервера OpenVPN.

Шаг 2 — обновляем Вашу систему и устанавливаем ufw
Прежде чем установить и настроить OpenVPN, нужно сначала обновить систему и установить фаервол ufw.
Обновляем операционную систему
Введите команду apt-get / apt для обновления системы:
После установки ядра Linux обязательно необходима перезагрузка. Для этого можно ввести следующую команду:
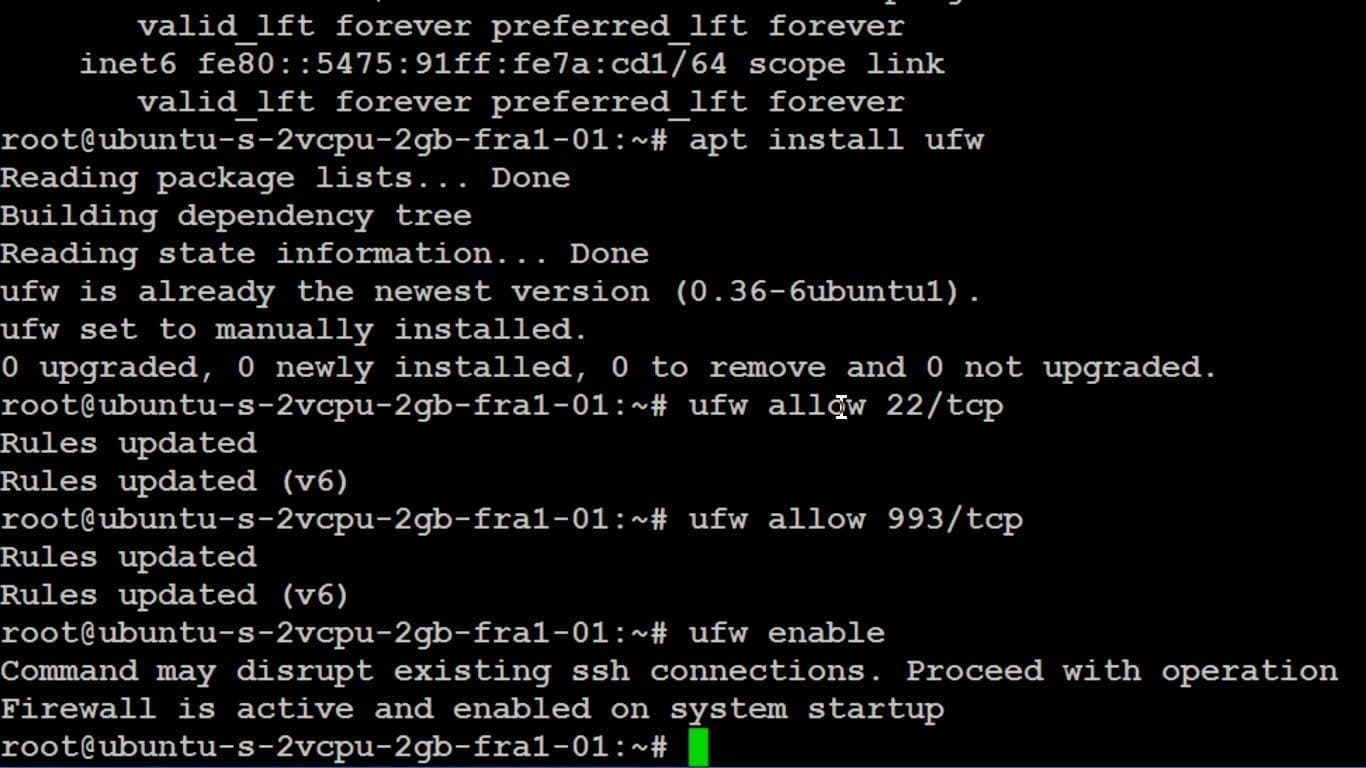
Устанавливаем ufw (простой фаервол)
Для установки ufw на Ubuntu / Debian следует ввести команду:
Также нам нужно открыть затребованные порты, такие как SSH port 22, 80, 443, 993 и так далее:
Для включения фаервола воспользуемся следующей командой:
Состояние правил фаервола можно проверить так:
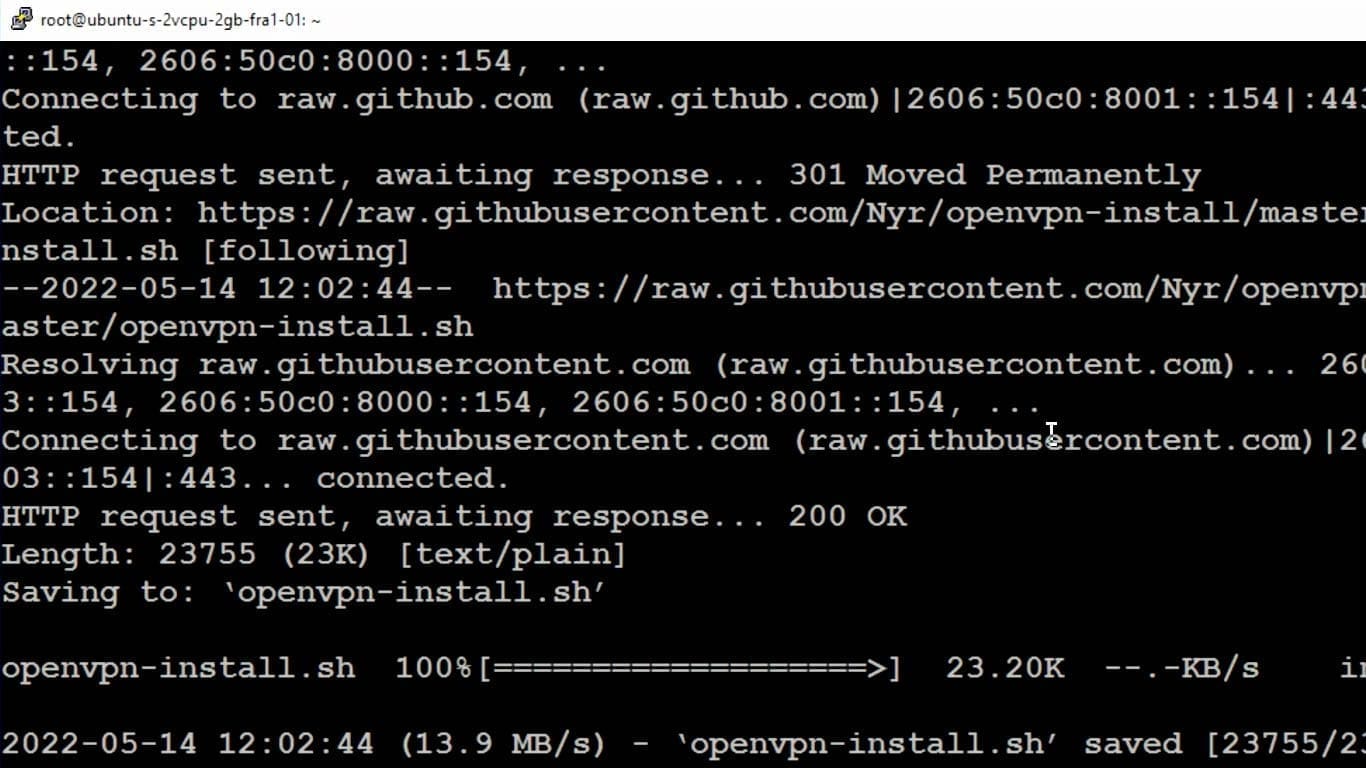
Шаг 3 — устанавливаем скрипт openvpn-install.sh
Продолжаем рассказывать о том, как настроить OpenVPN. Введем команду wget:
Пример вывода:
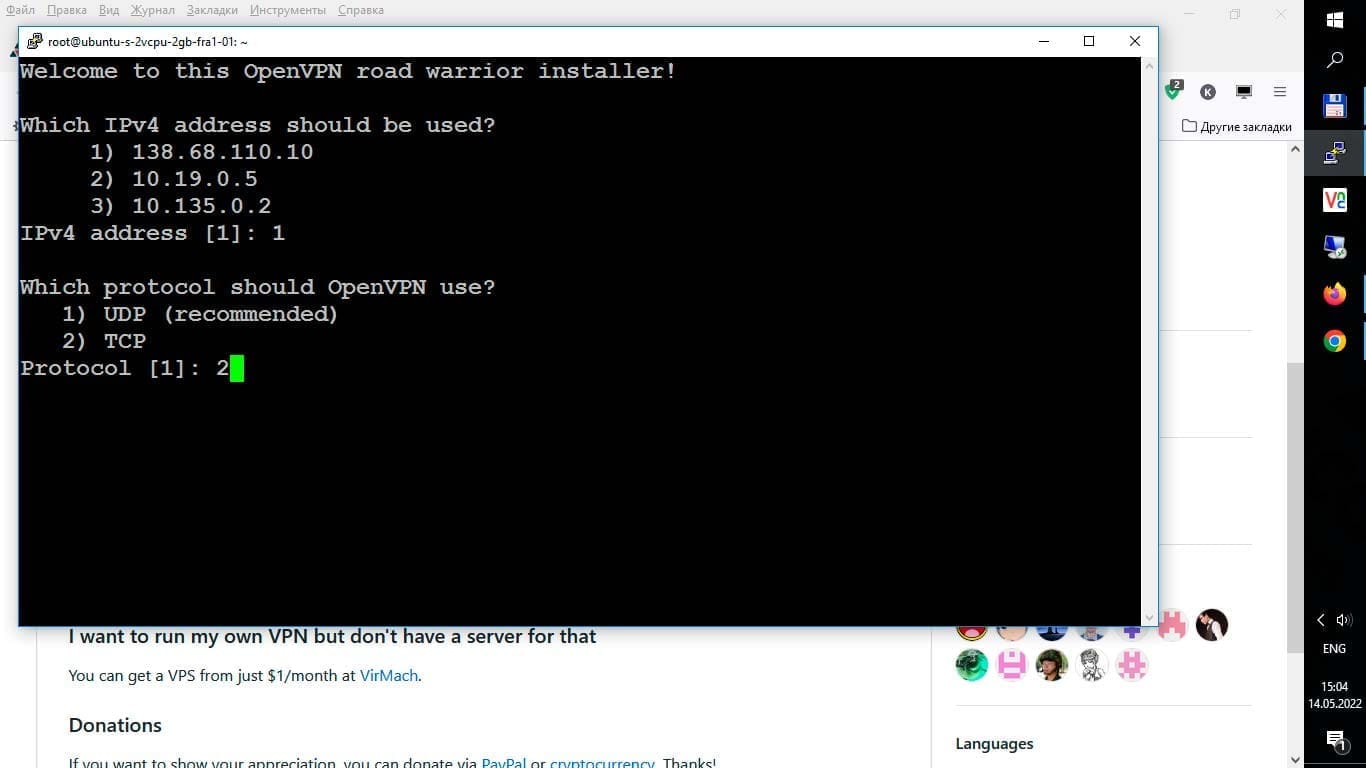
Запустим скрипт openvpn-install.sh для установки и настройки сервера OpenVPN в автоматическом режиме:
На первом шаге выбираем IP-адрес 138.68.110.10 (замените 138.68.110.10 на Ваш актуальный IP). На втором шаге — выбираем протокол, по которому будет работать OpenVPN. В нашем случае — это протокол TCP.
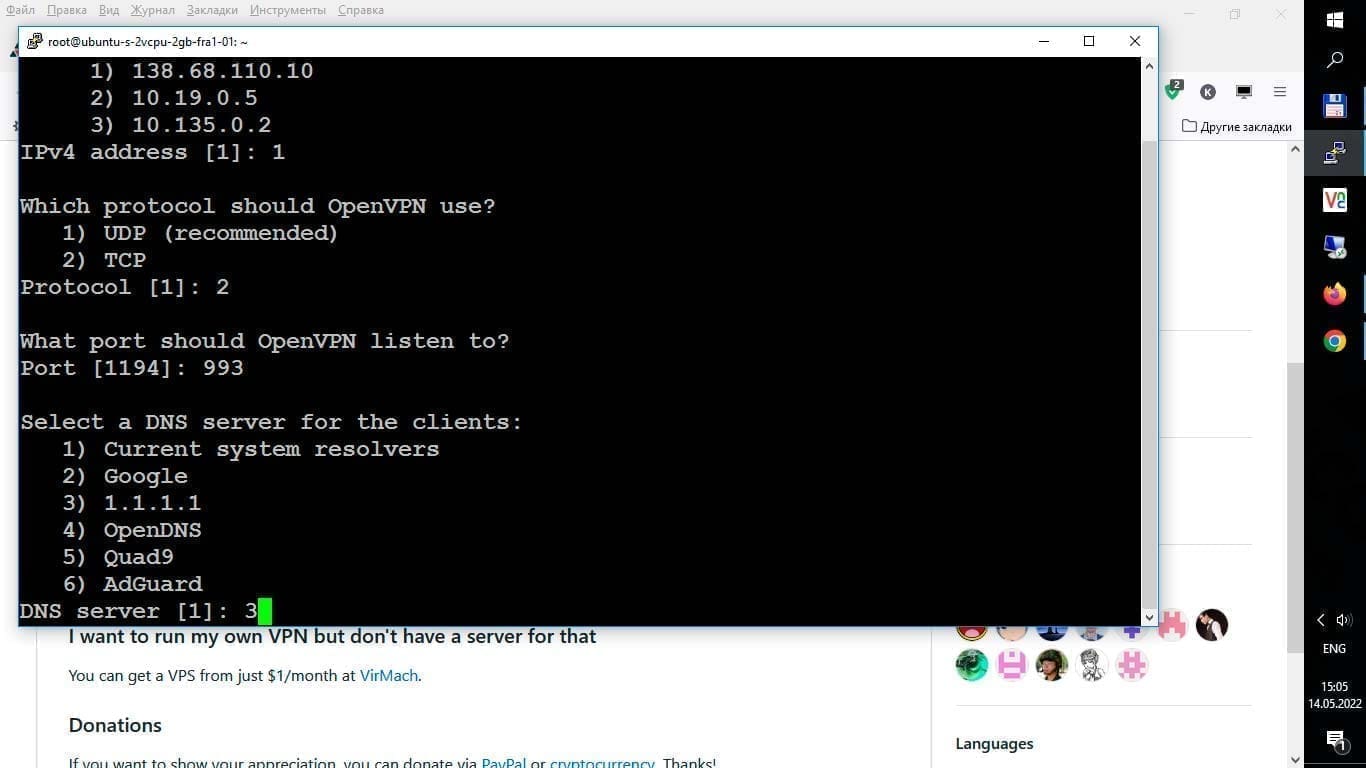
На третьем шаге выбираем порт, на котором будет работать OpenVPN-сервер. Поскольку мы будем «прятаться» под IMAPS, указываем порт 993. На четвертом шаге — выбираем, какой именно DNS-сервер будем использовать, В нашем случае — CloudFlare.
На последнем этапе — указываем имя клиента (например, client-01, client-02, и т. д.). Нажимаем Enter, скрипт должен все успешно установить.
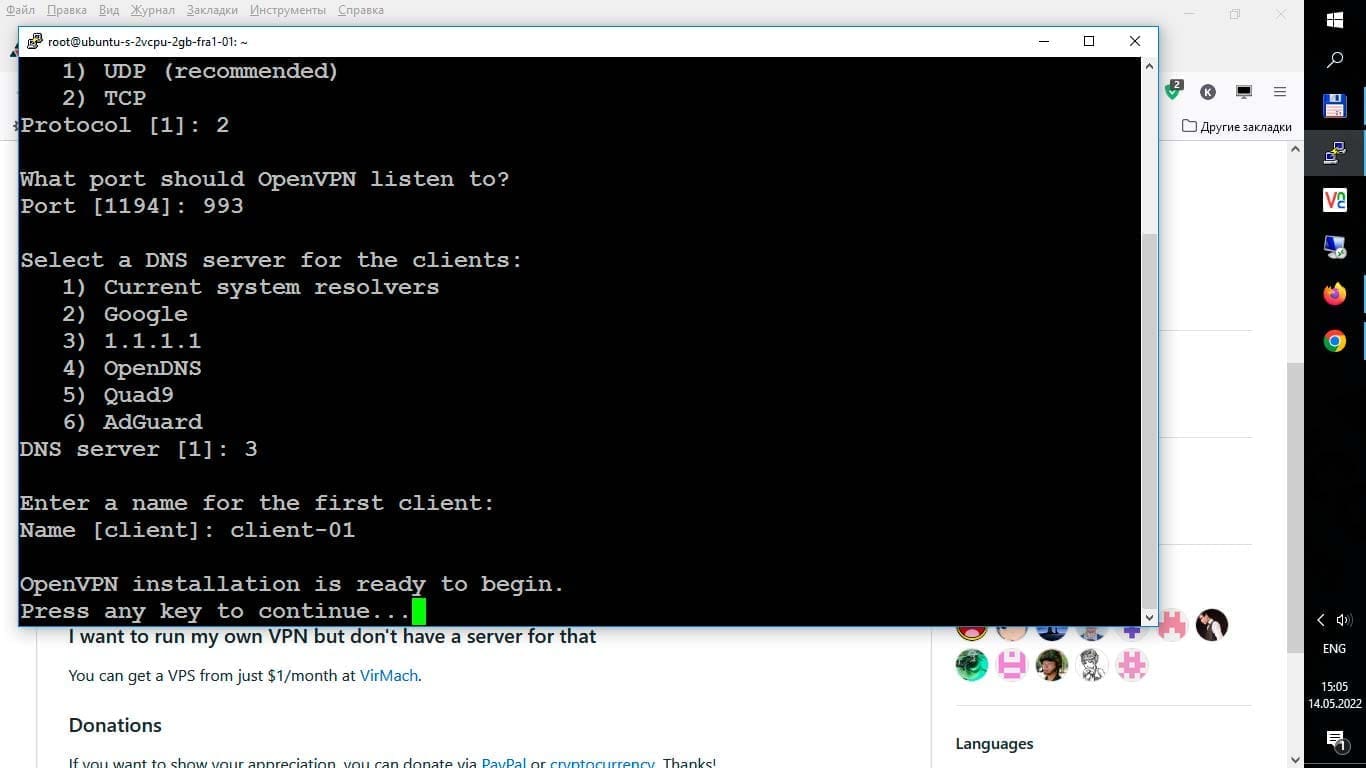
Пример вывода:
На этом всё. Вы смогли настроить OpenVPN, а точнее — его серверную часть. И теперь она полностью готова к работе. Вы можете посмотреть файл добавленных правил фаервола в каталоге по адресу /etc/systemd/system/multi-user.target.wants/openvpn-iptables.service, используя команду cat:
Кроме того, Вы можете посмотреть настройки Вашего сервера OpenVPN, сгенерировав их скриптом, приведенным ниже:
Важно: не редактируйте этот файл вручную!
Как запускать / останавливать / перезапускать OpenVPN сервер на Ubuntu / Debian / CentOS
Давайте теперь разберемся в том, как работать с сервером OpenVPN. И какие именно команды для этого могут использоваться.
Для остановки службы OpenVPN предназначена следующая команда:
Для запуска службы OpenVPN предназначена следующая команда:
Для перезапуска службы OpenVPN предназначена следующая команда:
Шаг 4 — настраиваем клиент OpenVPN
Есть еще несколько полезных вещей, которые помогут качественно настроить OpenVPN. К примеру, на сервере Вы найдете файл настройки клиента с названием ~/client-01.ovpn. Этот файл находится в домашней папке пользователя, от имени которого Вы запускали приведенный выше скрипт. Все, что Вам нужно сделать — это скопировать данный файл на Ваш локальный рабочий стол и предоставить его OpenVPN-клиенту. Для этого установим веб-сервер Apache, чтобы можно было скачать конфигурацию:
Редактируем файл конфигурации хостинга:
Который следует привести к следующему виду:
Создадим файл /var/www/html/.htaccess:
Со следующим содержимым:
Скопируем файл конфигурации в рабочую папку веб-сервера:
Чтобы скачать файл конфигурации с сервера — на планшете / телефоне / ноутбуке открываем браузер и пишем в адресную строку:
Будет скачан файл конфигурации, и дальше мы можем его импортировать в программу клиента.
Устанавливаем и настраиваем клиент OpenVPN для Вашей операционной системы
- OpenVPN для Apple IOS version 6.x или выше;
- OpenVPN для Android;
- OpenVPN для Apple MacOS (OS X);
- OpenVPN для Windows 7/8/10.
Настраиваем клиент OpenVPN для MacOS / OS X
Для начала установите клиент OpenVPN под macOS. Далее дважды нажмите на значок файла macos-vpn-client.ovpn — и он откроется в Вашем клиенте tunnelblick. Выберите вариант Only Me для установки.

Единожды нажав кнопку Connect, Вы будете оставаться онлайн. Используйте приведенные ниже команды на клиентах MacOS для подтверждения замены Вашего публичного IP-адреса на IP-адрес VPN-сервера (введите в Вашем локальном Linux / Unix / MacOS)
Пример вывода:
Вы можете проверить связь сервера OpenVPN с частного IP:
Пример вывода:
Настраиваем клиент OpenVPN для Linux
Установка клиента OpenVPN на RHEL / CentOS Linux осуществляется командой yum:
Тогда как установки клиента OpenVPN на Debian / Ubuntu Linux осуществляется командой apt:
Далее — скопируйте client-01.ovpn, как показано ниже:
Проверьте соединение от CLI:
Ваша система Linux будет автоматически подключена, когда компьютер перезапустится (используя скрипт /etc/init.d/openvpn):
Для систем, построенных на systemd, нужно поступать следующим образом:
Проверьте соединение:
Настраиваем клиент OpenVPN для FreeBSD
Установите клиент OpenVPN на свою систему FreeBSD. Для этого введите в командную строку:
Далее — скопируйте macos-vpn-client.ovpn следующим образом:
Редактирование /etc/rc.conf и добавление следует выполнить по следующему примеру:
Запуск службы OpenVPN осуществляется так:
Подтверждение:
Ссылки:
На этом все, теперь у Вас получилось настроить сервер OpenVPN. Это поможет достигнуть нового уровня приватности за счет личного облачного сервера Ubuntu / Debian /CentOS.
Настраиваем клиент OpenVPN для Windows
Теперь расскажем о том, как настроить OpenVPN для Windows.Скачиваем OpenVPN по этой ссылке: https://openvpn.net/community-downloads/. И выполняем установку, соглашаясь со всеми предложениями мастера установки.
Скачиваем файл конфигурации для Windows с сервера. Для этого мы будем использовать WinSCP — скачать его можно по ссылке: https://winscp.net/eng/downloads.php.
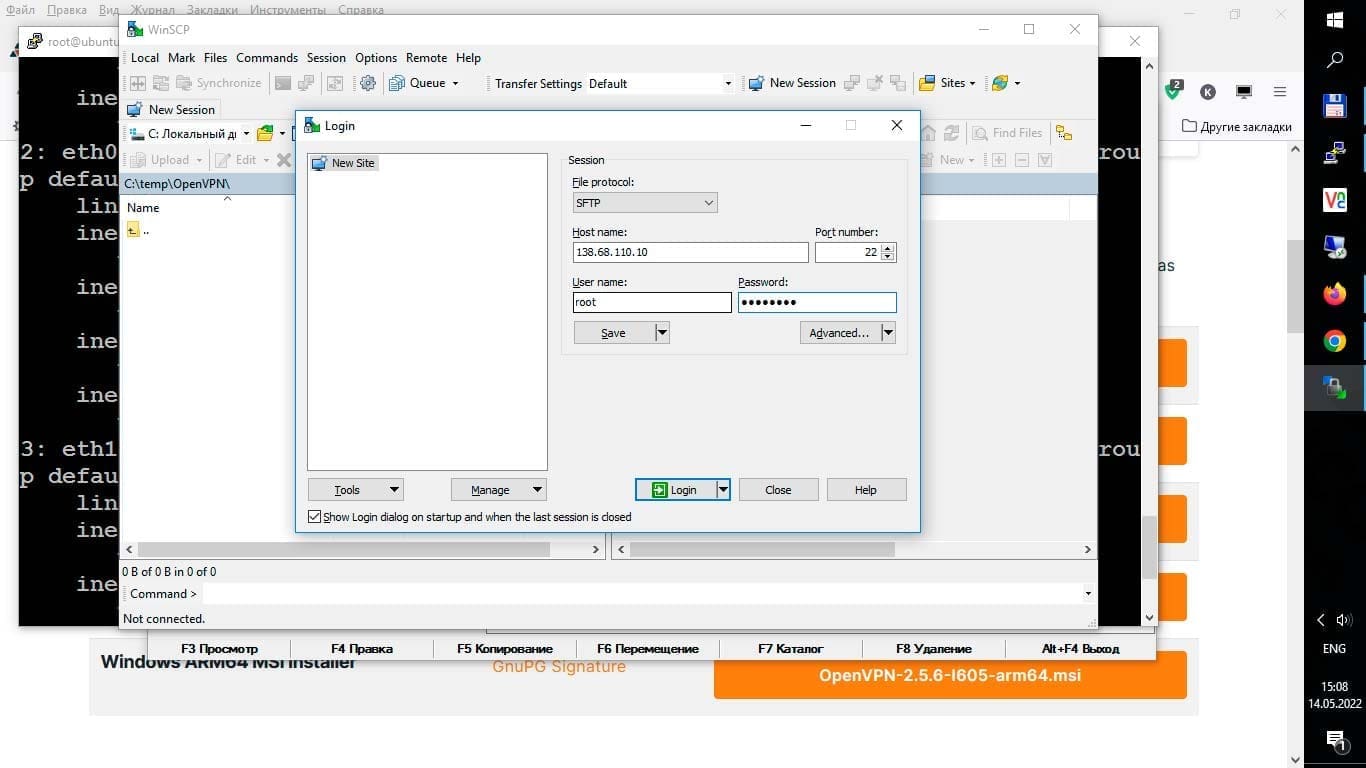
Далее подключаемся к серверу и скачиваем файл конфигурации.
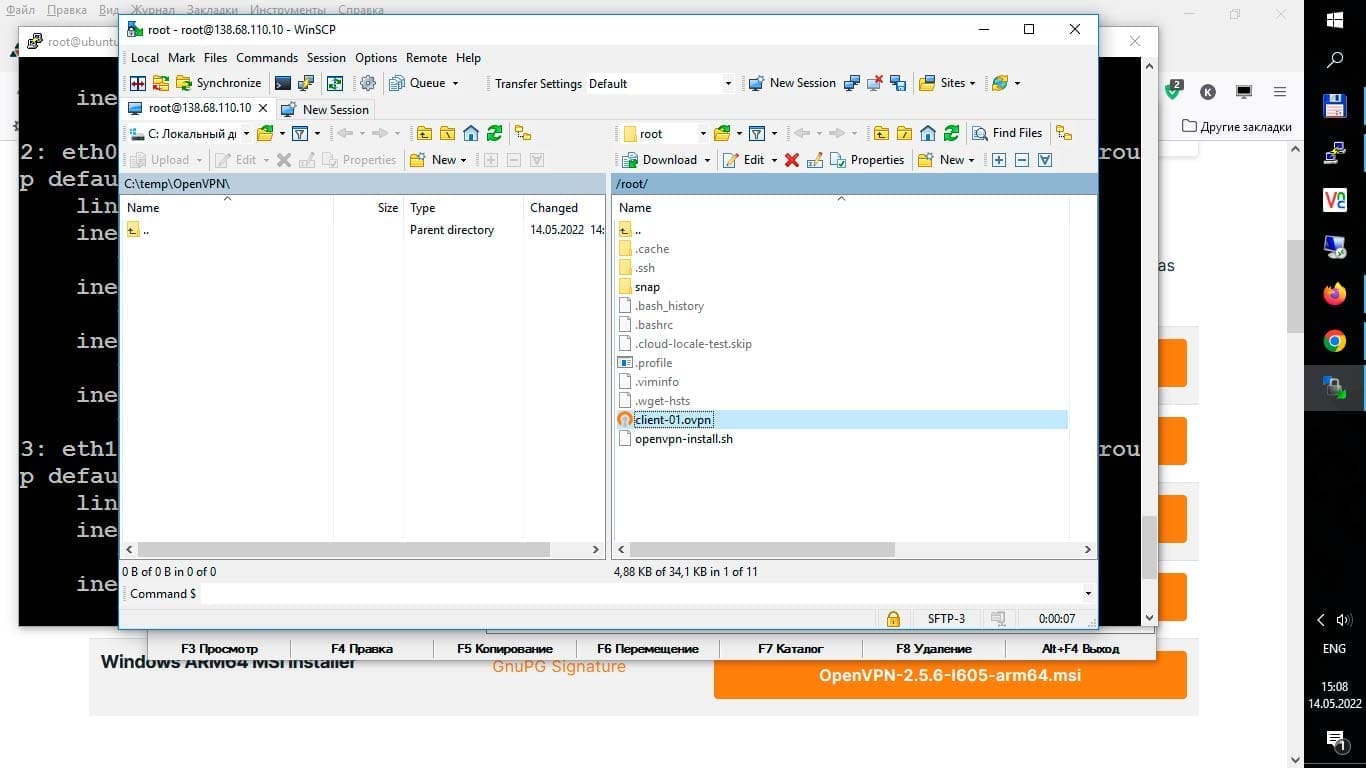
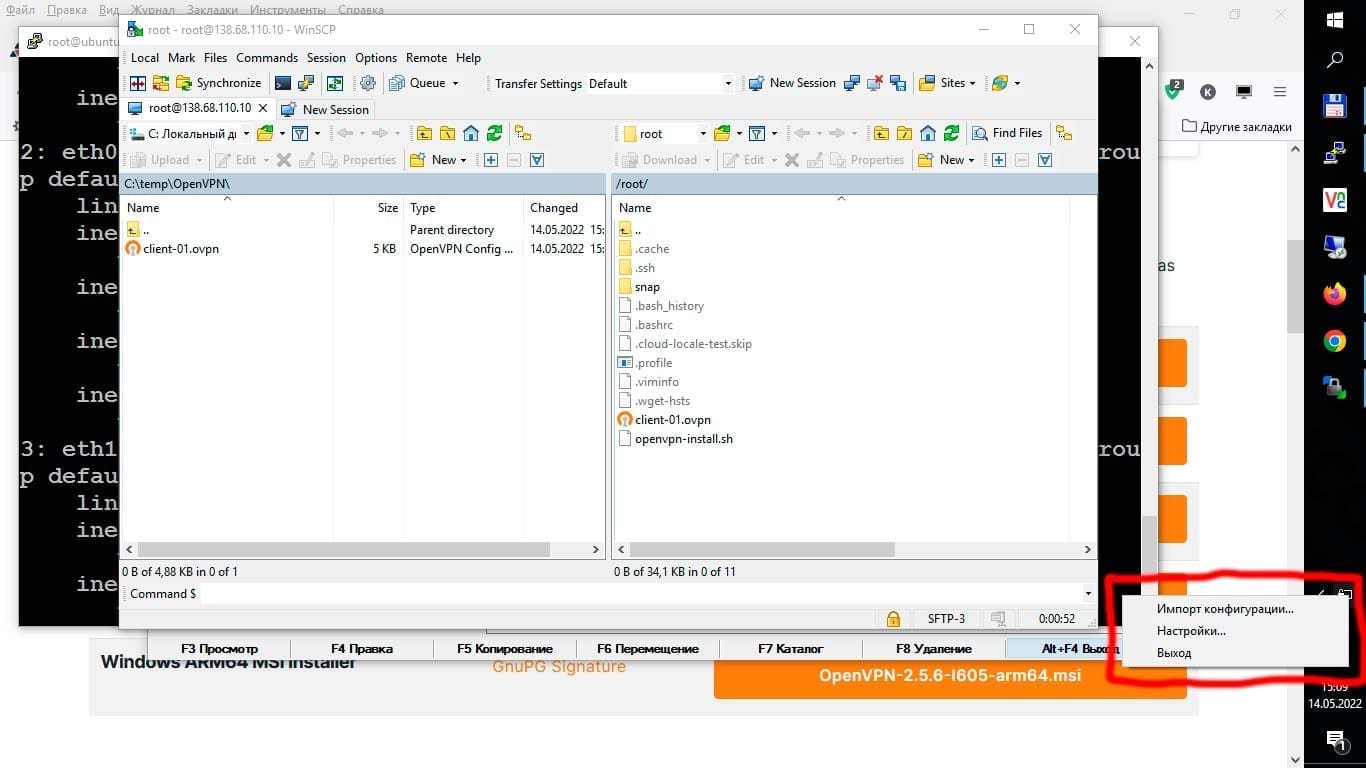
Запускаем OpenVPN GUI и видим, что программа запрашивает файл конфигурации.
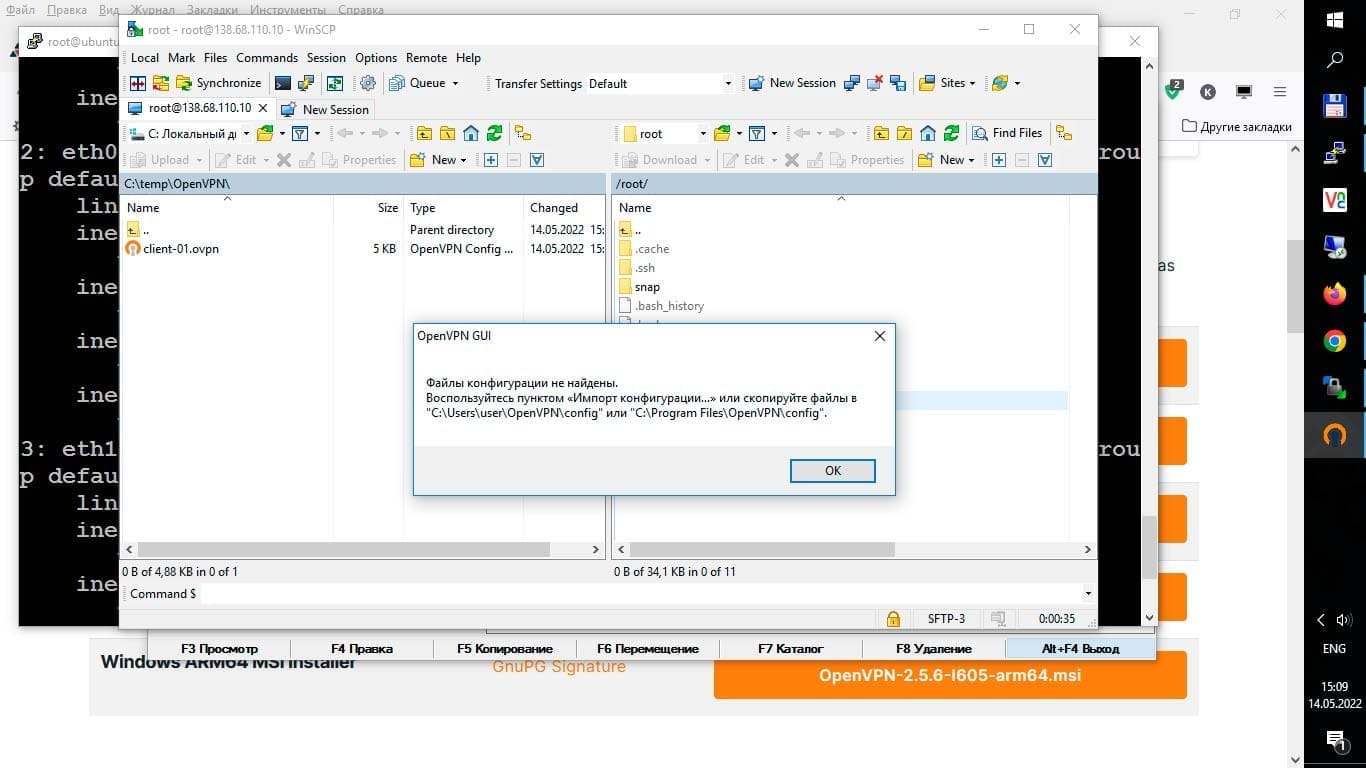
Нажимаем правой кнопкой мышки на иконку OpenVPN GUI (на панели задач) и выбираем пункт меню «Импортировать конфигурацию».
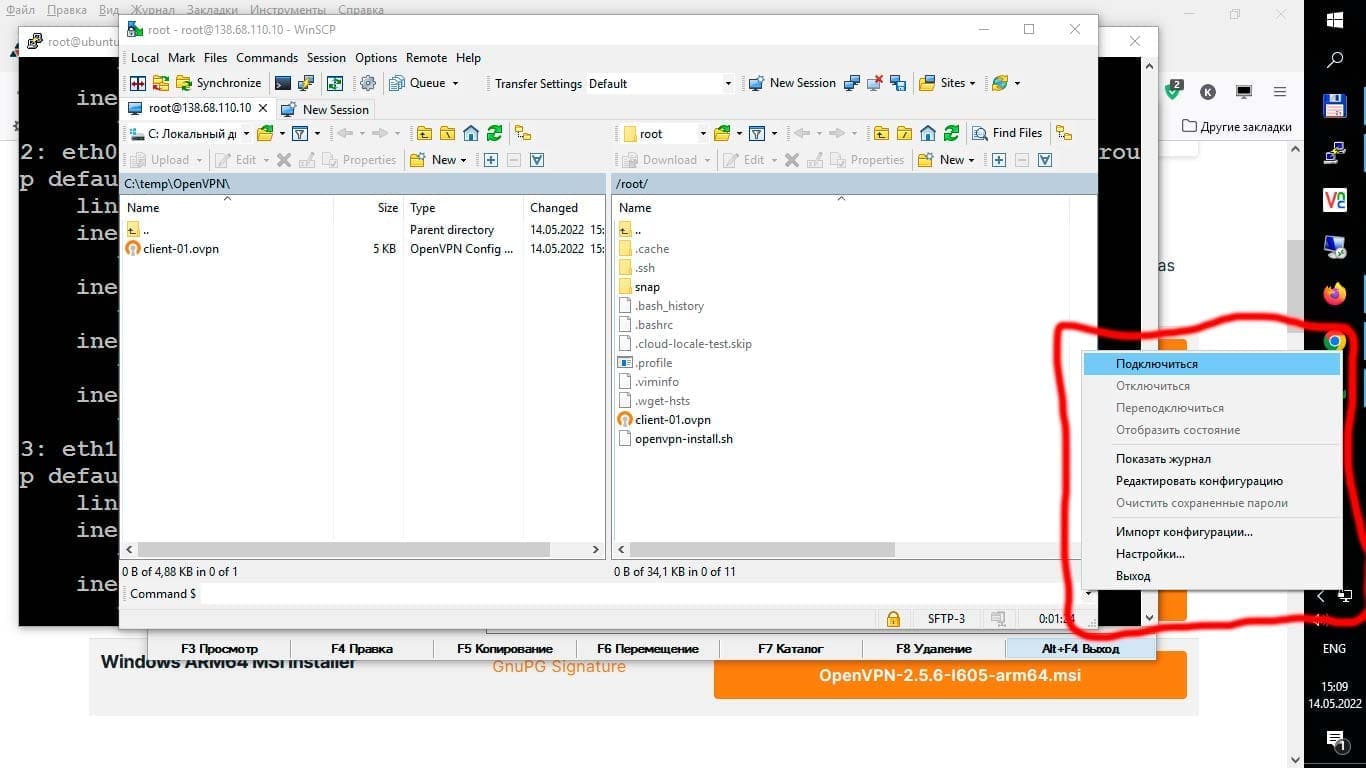
Снова нажимаем правой кнопкой мышки на иконку OpenVPN GUI и на этот раз выбираем пункт меню «Подключиться».
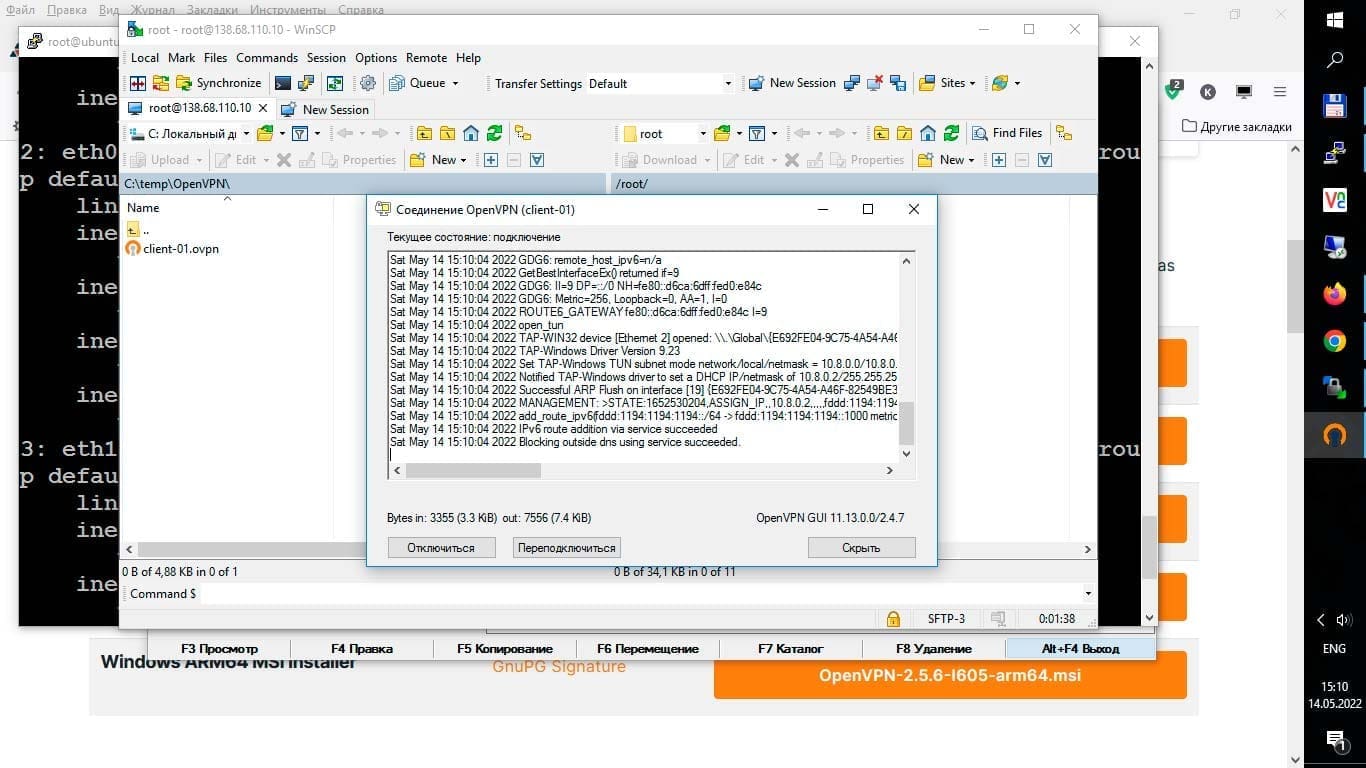
Далее в статусе мы должны увидеть «Подключено».
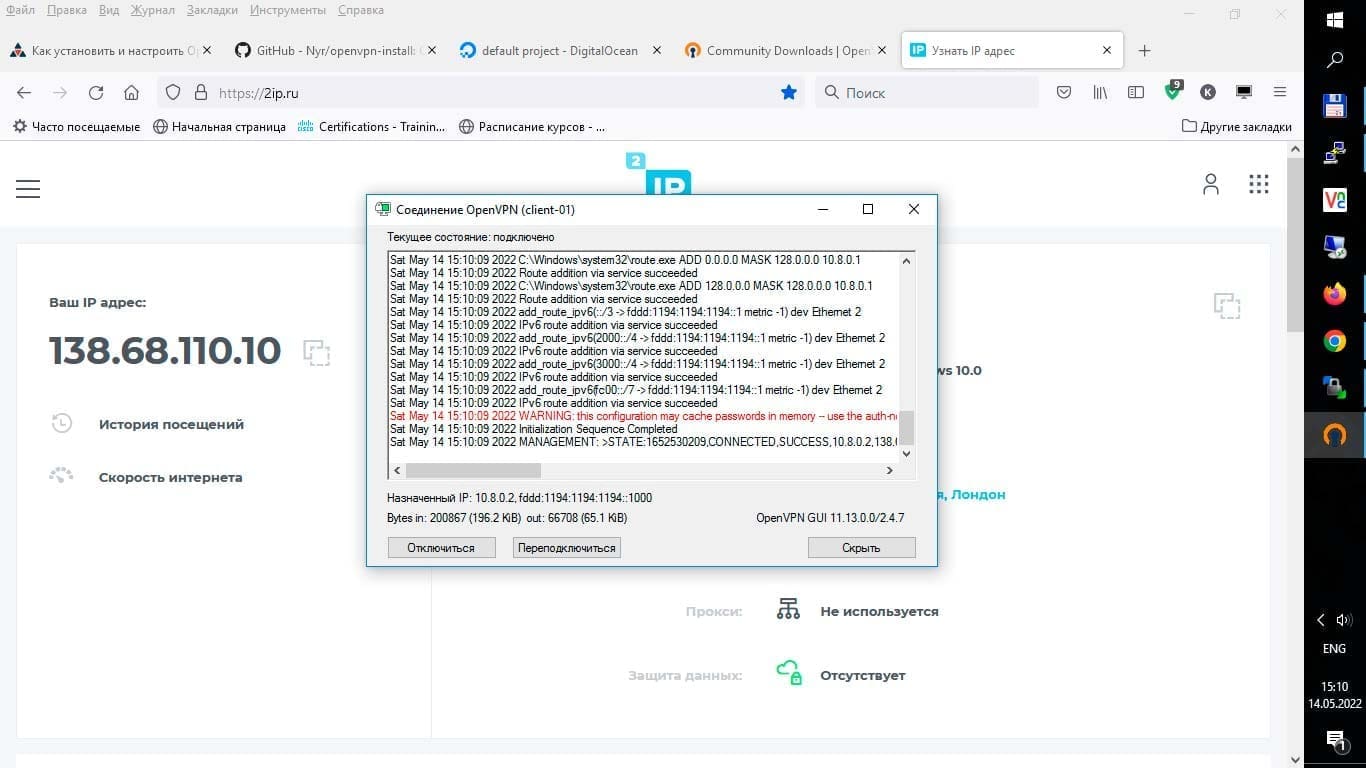
Заходим на 2ip.ru, и видим, что у нас поменялись и IP-адрес, и страна.
Выводы
Как показала практика, настроить OpenVPN сервер на Ubuntu / Debian / CentOS можно всего за 5 минут! Тем самым обезопасив себя от множества угроз в интернете и обеспечив себе возможность обойти различные блокировки и ограничения, привязанные к местоположению пользователя.
Спасибо за время, которое Вы уделили прочтению статьи!
Если у Вас возникли вопросы — задавайте их в комментариях!
Чтобы знать больше и выделяться знаниями среди толпы IT-шников, записывайтесь на курсы Cisco, курсы по кибербезопасности, полный курс по кибербезопасности, курсы DevNet / DevOps (программируемые системы) от Академии Cisco, курсы Linux от Linux Professional Institute на платформе SEDICOMM University (Университет СЭДИКОММ).
Курсы Cisco, Linux, кибербезопасность, DevOps / DevNet, Python с трудоустройством!
- Поможем стать экспертом по сетевой инженерии, кибербезопасности, программируемым сетям и системам и получить международные сертификаты Cisco, Linux LPI, Python Institute.
- Предлагаем проверенную программу с лучшими учебниками от экспертов из Cisco Networking Academy, Linux Professional Institute и Python Institute, помощь сертифицированных инструкторов и личного куратора.
- Поможем с трудоустройством и стартом карьеры в сфере IT — 100% наших выпускников трудоустраиваются.
- Проведем вечерние онлайн-лекции на нашей платформе.
- Согласуем с вами удобное время для практик.
- Если хотите индивидуальный график — обсудим и реализуем.
- Личный куратор будет на связи, чтобы ответить на вопросы, проконсультировать и мотивировать придерживаться сроков сдачи экзаменов.
- Всем, кто боится потерять мотивацию и не закончить обучение, предложим общение с профессиональным коучем.
- отредактировать или создать с нуля резюме;
- подготовиться к техническим интервью;
- подготовиться к конкурсу на понравившуюся вакансию;
- устроиться на работу в Cisco по специальной программе. Наши студенты, которые уже работают там: жмите на #НашиВCisco Вконтакте, #НашиВCisco Facebook.


96 комментариев. Оставить новый
Окей, спасибо за скрипт. Но как теперь для второго клиента создать сертификат и ключи?
Самый простой способ это добавить в файл конфигурации сервера, он лежит в /etc/openvpn/ опцию: duplicate-cn
Это позволит подключать несколько клиентов с одинаковыми ключами и сертификатами.
Далее нужно перезапустить сервер.
а если нужно с разными ключами и сертификатами?
Установщик же пишет при завершении установки:
«If you want to add more clients, you simply need to run this script again!»
Что в переводе означает:
«Если вы хотите добавить других клиентов, вам просто нужно запустить этот скрипт снова!»
что можно сделать если местный провайдер заблокировал ip который дал впс сервер? дело в том что всё работало несколько дней и вдруг ip заблокирован, проверено программой WinMTR,
Зачем не работаеть duplicate-cn? Установил OpenVPN server в VULTR. duplicate-cn не помогло. файл конфигурации в моего сервера находится в «/etc/openvpn/server/server.conf». Что мне делать, помогите.
Думаю профи самостоятельно установят, а мне как новичку абсолютно не понятно зачем устанавливается фаервол и клиент если часто есть встроенные клиенты…
В общем не хватает комментирования и пояснения действий. — без этого статья похожа на все остальные в инете. Порой появляется впечатление что друг у друга копипастят статьи меняя лишь слова между командами.
Тупо инструкция, ни чему хорошему не учит = толку мало.
«ни чему хорошему»: действовать по инструкции без, хотябы маленького, понимания сути — плохо.
1. Фаервол нужно настроить для работы NAT, чтобы скрывались внутренние адреса VPN клиентов за публичным ip адресом сервера. Рассказать какие виды NAT-ов существуют и как работают нет возможности, это кусок курса по сетям Cisco CCNA.
2. OpenVPN клиент нужно устанавливать потому что его нету в системе, встроенные клиенты это для PPTP или L2TP, а для OpenVPN как раз нет встроенного.
Здравствуйте. Каким образом сделать клиенту доступ с паролем?
В файл конфигурации сервера /etc/openvpn/server.conf добавить:
auth-user-pass-verify /etc/openvpn/auth.sh via-envscript-security 3
Содержимое скрипта авторизации /etc/openvpn/auth.sh:
#!/bin/bashuser1="user"
pass1="qawsed"
test "$user1" = "${username}" && test "$pass1" = "${password}" && exit 0
exit 1
Этот файл нужно сделать исполняемым:
chmod +x /etc/openvpn/auth.shВ файле клиента client.conf нужно добавить:
auth-user-passИ должно все работать: авторизация в OpenVPN с логином и паролем.
Спасибо сделал все получилось.
Добрый день, такая проблема — нет выхода в интернет
Подключается к серверу, пингует внешний ip сервера, но не пингует ya.ru
Windows клиент.
В чем может быть проблема.
Делал все по Вашей статье.
Добрый день, Михаил.
Покажите таблицу маршрутизации сервера и список правил фаервола.
netstat -rn
iptables —list
Добрый день, как создать новый ключ и сертификат для вторго клиента?
Здравствуйте, такая же проблема, нет выхода в интернет( Система Debian 9 stretch — виртуалка на Linux deploy для Android. Устанавливал 3proxy на систему — все работает. Здесь делал все пошагово и по инструкции (кроме UFW, при запуске выдает ошибку, обязателен ли он?). на выходе все подключается но выхода в интернет нет.
Добрый день!
UFW — обязателен. Собственно, он делает NAT и выход в интернет.
Понял, но при запуске ufw відает такую вот ошибку!
root@localhost:~# sudo ufw enable
Command may disrupt existing ssh connections. Proceed with operation (y|n)? y
ERROR: problem running ufw-init
modprobe: ERROR: ../libkmod/libkmod.c:586 kmod_search_moddep() could not open moddep file ‘/lib/modules/3.4.0-gad29d11/modules.dep.bin’
modprobe: FATAL: Module nf_conntrack_ftp not found in directory /lib/modules/3.4.0-gad29d11
modprobe: ERROR: ../libkmod/libkmod.c:586 kmod_search_moddep() could not open moddep file ‘/lib/modules/3.4.0-gad29d11/modules.dep.bin’
modprobe: FATAL: Module nf_nat_ftp not found in directory /lib/modules/3.4.0-gad29d11
modprobe: ERROR: ../libkmod/libkmod.c:586 kmod_search_moddep() could not open moddep file ‘/lib/modules/3.4.0-gad29d11/modules.dep.bin’
modprobe: FATAL: Module nf_conntrack_netbios_ns not found in directory /lib/modules/3.4.0-gad29d11
iptables-restore: line 77 failed
iptables-restore: line 30 failed
ip6tables-restore: line 138 failed
Problem running ‘/etc/ufw/before.rules’
Problem running ‘/etc/ufw/after.rules’
Problem running ‘/etc/ufw/before6.rules’
Да и после этого проверяю, пише что включен, но доступа к интернета нет.
root@localhost:~# sudo ufw status
Status: active
To Action From
— —— —-
22 ALLOW Anywhere
80 ALLOW Anywhere
443 ALLOW Anywhere
3128 ALLOW Anywhere
1194 ALLOW Anywhere
22 (v6) ALLOW Anywhere (v6)
80 (v6) ALLOW Anywhere (v6)
443 (v6) ALLOW Anywhere (v6)
3128 (v6) ALLOW Anywhere (v6)
1194 (v6) ALLOW Anywhere (v6)
И еще, если ufw делает NAT выход в интернет, то почему без включенного ufw 3proxy работает нормально, а openvpn нет. 3proxy ставил по этой инструкции https://community.vscale.io/hc/ru/community/posts/115001609005-%D0%A3%D1%81%D1%82%D0%B0%D0%BD%D0%BE%D0%B2%D0%BA%D0%B0-%D0%B8-%D0%BD%D0%B0%D1%81%D1%82%D1%80%D0%BE%D0%B9%D0%BA%D0%B0-%D0%BF%D1%80%D0%BE%D0%BA%D1%81%D0%B8-
Буду благодарен за помощь!
У вас должен работать NAT, он транслирует внутреннюю сеть openvpn в мир.
в файле: /etc/ufw/before.rules должны быть строчки:
#
# rules.before
#
# Rules that should be run before the ufw command line added rules. Custom
# rules should be added to one of these chains:
# ufw-before-input
# ufw-before-output
# ufw-before-forward
#
# START OPENVPN RULES
# NAT table rules
*nat
:POSTROUTING ACCEPT [0:0]
# Allow traffic from OpenVPN client to eth0
-A POSTROUTING -s 192.168.0.0/16 -o eth0 -j MASQUERADE
-A POSTROUTING -s 10.0.0.0/8 -o eth0 -j MASQUERADE
-A POSTROUTING -s 172.16.0.0/12 -o eth0 -j MASQUERADE
COMMIT
# END OPENVPN RULES
# Don’t delete these required lines, otherwise there will be errors
*filter
:ufw-before-input — [0:0]
:ufw-before-output — [0:0]
:ufw-before-forward — [0:0]
:ufw-not-local — [0:0]
# End required lines
Добавьте то чего у вас не хватает.
Прокси работает от ip сервера и для него не нужен NAT, а для OpenVPN — нужен.
Покажите таблицу маршрутизации, а то так тяжело угадать: netstat -rn
Да у файле before.rules это отсутствовало
# START OPENVPN RULES
# NAT table rules
*nat
:POSTROUTING ACCEPT [0:0]
# Allow traffic from OpenVPN client to eth0
-A POSTROUTING -s 192.168.0.0/16 -o eth0 -j MASQUERADE
-A POSTROUTING -s 10.0.0.0/8 -o eth0 -j MASQUERADE
-A POSTROUTING -s 172.16.0.0/12 -o eth0 -j MASQUERADE
COMMIT
# END OPENVPN RULES
после коррекции запустил ufw , тот же исход,запускается но с теми же ошибками
root@localhost:~# sudo ufw enable
Command may disrupt existing ssh connections. Proceed with operation (y|n)? y
ERROR: problem running ufw-init
modprobe: ERROR: ../libkmod/libkmod.c:586 kmod_search_moddep() could not open moddep file ‘/lib/modules/3.4.0-gad29d11/modules.dep.bin’
modprobe: FATAL: Module nf_conntrack_ftp not found in directory /lib/modules/3.4.0-gad29d11
modprobe: ERROR: ../libkmod/libkmod.c:586 kmod_search_moddep() could not open moddep file ‘/lib/modules/3.4.0-gad29d11/modules.dep.bin’
modprobe: FATAL: Module nf_nat_ftp not found in directory /lib/modules/3.4.0-gad29d11
modprobe: ERROR: ../libkmod/libkmod.c:586 kmod_search_moddep() could not open moddep file ‘/lib/modules/3.4.0-gad29d11/modules.dep.bin’
modprobe: FATAL: Module nf_conntrack_netbios_ns not found in directory /lib/modules/3.4.0-gad29d11
iptables-restore: line 88 failed
iptables-restore: line 30 failed
ip6tables-restore: line 138 failed
Problem running ‘/etc/ufw/before.rules’
Problem running ‘/etc/ufw/after.rules’
Problem running ‘/etc/ufw/before6.rules’
я так понимаю из за последних трех в нет и не пускает.
Вот таблица маршрутизации
Kernel IP routing table
Destination Gateway Genmask Flags MSS Window irtt Iface
10.8.0.0 0.0.0.0 255.255.255.0 U 0 0 0 tun0
192.168.1.0 0.0.0.0 255.255.255.0 U 0 0 0 wlan0
Вот еще iptables —list, если как то поможет!
Chain INPUT (policy ACCEPT)
target prot opt source destination
bw_INPUT all — anywhere anywhere
fw_INPUT all — anywhere anywhere
ufw-before-logging-input all — anywhere anywhere
ufw-before-input all — anywhere anywhere
ufw-after-input all — anywhere anywhere
ufw-after-logging-input all — anywhere anywhere
ufw-reject-input all — anywhere anywhere
ufw-track-input all — anywhere anywhere
Chain FORWARD (policy ACCEPT)
target prot opt source destination
oem_fwd all — anywhere anywhere
fw_FORWARD all — anywhere anywhere
bw_FORWARD all — anywhere anywhere
natctrl_FORWARD all — anywhere anywhere
ufw-before-logging-forward all — anywhere anywhere
ufw-before-forward all — anywhere anywhere
ufw-after-forward all — anywhere anywhere
ufw-after-logging-forward all — anywhere anywhere
ufw-reject-forward all — anywhere anywhere
ufw-track-forward all — anywhere anywhere
ACCEPT all — anywhere anywhere state RELATED,ESTABLISHED
ACCEPT all — 10.8.0.0/24 anywhere
REJECT all — anywhere anywhere reject-with icmp-port-unreachable
Chain OUTPUT (policy ACCEPT)
target prot opt source destination
oem_out all — anywhere anywhere
fw_OUTPUT all — anywhere anywhere
st_OUTPUT all — anywhere anywhere
bw_OUTPUT all — anywhere anywhere
ufw-before-logging-output all — anywhere anywhere
ufw-before-output all — anywhere anywhere
ufw-after-output all — anywhere anywhere
ufw-after-logging-output all — anywhere anywhere
ufw-reject-output all — anywhere anywhere
ufw-track-output all — anywhere anywhere
Chain bw_FORWARD (1 references)
target prot opt source destination
Chain bw_INPUT (1 references)
target prot opt source destination
all — anywhere anywhere UNKNOWN match `quota2′
all — anywhere anywhere owner socket exists
Chain bw_OUTPUT (1 references)
target prot opt source destination
all — anywhere anywhere UNKNOWN match `quota2′
all — anywhere anywhere owner socket exists
Chain bw_costly_shared (0 references)
target prot opt source destination
bw_penalty_box all — anywhere anywhere
Chain bw_happy_box (0 references)
target prot opt source destination
Chain bw_penalty_box (1 references)
target prot opt source destination
Chain fw_FORWARD (1 references)
target prot opt source destination
Chain fw_INPUT (1 references)
target prot opt source destination
fw_standby all — anywhere anywhere
Chain fw_OUTPUT (1 references)
target prot opt source destination
fw_standby all — anywhere anywhere
Chain fw_dozable (0 references)
target prot opt source destination
RETURN all — anywhere anywhere owner UID match 10446
RETURN all — anywhere anywhere owner UID match aid_radio
RETURN all — anywhere anywhere owner UID match aid_nfc
RETURN all — anywhere anywhere owner UID match 10009
RETURN all — anywhere anywhere owner UID match 10024
RETURN all — anywhere anywhere owner UID match 10026
RETURN all — anywhere anywhere owner UID match 10075
RETURN all — anywhere anywhere owner UID match 10188
RETURN all — anywhere anywhere owner UID match 0-9999
DROP all — anywhere anywhere
Chain fw_standby (2 references)
target prot opt source destination
DROP all — anywhere anywhere owner UID match 10096
DROP all — anywhere anywhere owner UID match 10437
DROP all — anywhere anywhere owner UID match 10034
DROP all — anywhere anywhere owner UID match 10116
DROP all — anywhere anywhere owner UID match 10088
DROP all — anywhere anywhere owner UID match 10000
DROP all — anywhere anywhere owner UID match 10090
DROP all — anywhere anywhere owner UID match 10048
DROP all — anywhere anywhere owner UID match 10133
DROP all — anywhere anywhere owner UID match 10063
DROP all — anywhere anywhere owner UID match 10065
DROP all — anywhere anywhere owner UID match 10109
DROP all — anywhere anywhere owner UID match 10443
DROP all — anywhere anywhere owner UID match 10441
DROP all — anywhere anywhere owner UID match 10003
DROP all — anywhere anywhere owner UID match 10089
DROP all — anywhere anywhere owner UID match 10132
DROP all — anywhere anywhere owner UID match 10369
DROP all — anywhere anywhere owner UID match 10445
DROP all — anywhere anywhere owner UID match 10041
DROP all — anywhere anywhere owner UID match 10178
DROP all — anywhere anywhere owner UID match 10320
DROP all — anywhere anywhere owner UID match 10442
DROP all — anywhere anywhere owner UID match 10001
DROP all — anywhere anywhere owner UID match 10008
DROP all — anywhere anywhere owner UID match 10010
DROP all — anywhere anywhere owner UID match 10011
DROP all — anywhere anywhere owner UID match 10012
DROP all — anywhere anywhere owner UID match 10015
DROP all — anywhere anywhere owner UID match 10016
DROP all — anywhere anywhere owner UID match 10017
DROP all — anywhere anywhere owner UID match 10018
DROP all — anywhere anywhere owner UID match 10020
DROP all — anywhere anywhere owner UID match 10021
DROP all — anywhere anywhere owner UID match 10022
DROP all — anywhere anywhere owner UID match 10023
DROP all — anywhere anywhere owner UID match 10025
DROP all — anywhere anywhere owner UID match 10027
DROP all — anywhere anywhere owner UID match 10028
DROP all — anywhere anywhere owner UID match 10029
DROP all — anywhere anywhere owner UID match 10030
DROP all — anywhere anywhere owner UID match 10032
DROP all — anywhere anywhere owner UID match 10035
DROP all — anywhere anywhere owner UID match 10037
DROP all — anywhere anywhere owner UID match 10038
DROP all — anywhere anywhere owner UID match 10039
DROP all — anywhere anywhere owner UID match 10040
DROP all — anywhere anywhere owner UID match 10042
DROP all — anywhere anywhere owner UID match 10043
DROP all — anywhere anywhere owner UID match 10044
DROP all — anywhere anywhere owner UID match 10045
DROP all — anywhere anywhere owner UID match 10047
DROP all — anywhere anywhere owner UID match 10049
DROP all — anywhere anywhere owner UID match 10050
DROP all — anywhere anywhere owner UID match 10051
DROP all — anywhere anywhere owner UID match 10052
DROP all — anywhere anywhere owner UID match 10055
DROP all — anywhere anywhere owner UID match 10056
DROP all — anywhere anywhere owner UID match 10057
DROP all — anywhere anywhere owner UID match 10058
DROP all — anywhere anywhere owner UID match 10059
DROP all — anywhere anywhere owner UID match 10060
DROP all — anywhere anywhere owner UID match 10061
DROP all — anywhere anywhere owner UID match 10062
DROP all — anywhere anywhere owner UID match 10064
DROP all — anywhere anywhere owner UID match 10069
DROP all — anywhere anywhere owner UID match 10071
DROP all — anywhere anywhere owner UID match 10074
DROP all — anywhere anywhere owner UID match 10077
DROP all — anywhere anywhere owner UID match 10081
DROP all — anywhere anywhere owner UID match 10082
DROP all — anywhere anywhere owner UID match 10083
DROP all — anywhere anywhere owner UID match 10085
DROP all — anywhere anywhere owner UID match 10086
DROP all — anywhere anywhere owner UID match 10091
DROP all — anywhere anywhere owner UID match 10097
DROP all — anywhere anywhere owner UID match 10103
DROP all — anywhere anywhere owner UID match 10105
DROP all — anywhere anywhere owner UID match 10113
DROP all — anywhere anywhere owner UID match 10122
DROP all — anywhere anywhere owner UID match 10129
DROP all — anywhere anywhere owner UID match 10131
DROP all — anywhere anywhere owner UID match 10137
DROP all — anywhere anywhere owner UID match 10138
DROP all — anywhere anywhere owner UID match 10140
DROP all — anywhere anywhere owner UID match 10159
DROP all — anywhere anywhere owner UID match 10160
DROP all — anywhere anywhere owner UID match 10171
DROP all — anywhere anywhere owner UID match 10199
DROP all — anywhere anywhere owner UID match 10231
DROP all — anywhere anywhere owner UID match 10300
DROP all — anywhere anywhere owner UID match 10302
DROP all — anywhere anywhere owner UID match 10321
DROP all — anywhere anywhere owner UID match 10357
DROP all — anywhere anywhere owner UID match 10373
DROP all — anywhere anywhere owner UID match 10381
DROP all — anywhere anywhere owner UID match 10406
DROP all — anywhere anywhere owner UID match 10411
DROP all — anywhere anywhere owner UID match 10424
DROP all — anywhere anywhere owner UID match 10447
Chain natctrl_FORWARD (1 references)
target prot opt source destination
DROP all — anywhere anywhere
Chain natctrl_tether_counters (0 references)
target prot opt source destination
Chain oem_fwd (1 references)
target prot opt source destination
Chain oem_out (1 references)
target prot opt source destination
Chain st_OUTPUT (1 references)
target prot opt source destination
Chain st_clear_caught (2 references)
target prot opt source destination
Chain st_clear_detect (0 references)
target prot opt source destination
REJECT all — anywhere anywhere connmark match 0x2000000/0x2000000 reject-with icmp-port-unreachable
RETURN all — anywhere anywhere connmark match 0x1000000/0x1000000
CONNMARK tcp — anywhere anywhere u32 «0x0>>0x16&0x3c@0xc>>0x1a&0x3c@0x0&0xffff0000=0x16030000&&0x0>>0x16&0x3c@0xc>>0x1a&0x3c@0x4&0xff0000=0x10000» CONNMARK or 0x1000000
CONNMARK udp — anywhere anywhere u32 «0x0>>0x16&0x3c@0x8&0xffff0000=0x16fe0000&&0x0>>0x16&0x3c@0x14&0xff0000=0x10000» CONNMARK or 0x1000000
RETURN all — anywhere anywhere connmark match 0x1000000/0x1000000
st_clear_caught tcp — anywhere anywhere state ESTABLISHED u32 «0x0>>0x16&0x3c@0xc>>0x1a&0x3c@0x0&0x0=0x0»
st_clear_caught udp — anywhere anywhere
Chain st_penalty_log (0 references)
target prot opt source destination
CONNMARK all — anywhere anywhere CONNMARK or 0x1000000
NFLOG all — anywhere anywhere
Chain st_penalty_reject (0 references)
target prot opt source destination
CONNMARK all — anywhere anywhere CONNMARK or 0x2000000
NFLOG all — anywhere anywhere
REJECT all — anywhere anywhere reject-with icmp-port-unreachable
Chain ufw-after-forward (1 references)
target prot opt source destination
Chain ufw-after-input (1 references)
target prot opt source destination
Chain ufw-after-logging-forward (1 references)
target prot opt source destination
Chain ufw-after-logging-input (1 references)
target prot opt source destination
Chain ufw-after-logging-output (1 references)
target prot opt source destination
Chain ufw-after-output (1 references)
target prot opt source destination
Chain ufw-before-forward (1 references)
target prot opt source destination
Chain ufw-before-input (1 references)
target prot opt source destination
Chain ufw-before-logging-forward (1 references)
target prot opt source destination
Chain ufw-before-logging-input (1 references)
target prot opt source destination
Chain ufw-before-logging-output (1 references)
target prot opt source destination
Chain ufw-before-output (1 references)
target prot opt source destination
Chain ufw-reject-forward (1 references)
target prot opt source destination
Chain ufw-reject-input (1 references)
target prot opt source destination
Chain ufw-reject-output (1 references)
target prot opt source destination
Chain ufw-track-forward (1 references)
target prot opt source destination
Chain ufw-track-input (1 references)
target prot opt source destination
Chain ufw-track-output (1 references)
target prot opt source destination
А если OpenVPN-сервер (лок. адрес 10.2.2.11) находится в локальной сети за NAT, порт с роутера (10.2.2.1) проброшен, удаленный клиент подключается нормально, пингует OVPN-сервер 10.8.0.1 и с сервера клиент 10.8.0.2 пингуется, но на клиенте нет интернета, tracert доходит до шлюза 10.8.0.1 и всё, далее не маршрутизируется. На сервере интернет работает.
netstat -rn
Destination Gateway Genmask Flags MSS Window irtt Iface
0.0.0.0 10.2.2.1 0.0.0.0 UG 0 0 0 eth0
10.2.2.0 0.0.0.0 255.255.255.0 U 0 0 0 eth0
10.8.0.0 0.0.0.0 255.255.255.0 U 0 0 0 tun0
IP-Forward на сервере включил, но все равно клиент без интернета. Настройки сервера OVPN такие же как в этой статье.
Что можно ещё попробовать ?
Доброго времени суток!
У вас проблема с маршрутизацией, поэтому нужно исправить сеть 10.8.0.0 на 172.16.0.0 в файле конфигурации /etc/openvpn/server.conf и /etc/rc.local. Также нужно очистить файл ipp.txt с помощью команды: :>/etc/openvpn/ipp.txt. После этого все перегрузить и будет все ок. Если что пишите.
Спасибо за ответ!
Сеть оставил прежнюю 10.8.0.0/24 (все-таки она не пересекается с 10.2.2.0/24)
После чтения форумов, помогли следующие настройки ufw :
/etc/default/ufw:
DEFAULT_FORWARD_POLICY=»ACCEPT» #Было — «DROP»
/etc/ufw/before.rules:
*nat
:POSTROUTING ACCEPT [0:0]
-A POSTROUTING -s 10.8.0.0/8 -o eth0 -j MASQUERADE
COMMIT
После этого всё заработало.
Константин, ты просто супер! Респектище тебе за твою работу! Сколько я OpenVPN не настраивал так четко так и не смог настроить. И настраивается действительно за 10-15 минут и скорость офигенная и скрипт удобный… Я просто снимаю шляпу перед тобой )))
Спасибо! Мы стараемся. Напишите пожалуйста какие темы воркшопов для Вас будут интересны, мы с удовольствием сделаем.
Здравствуйте ,подключаюсь с андроида к впну ,вот такая ошибка вылазит ,и идёт переподключение «1:25 TLS Error: TLS object -> incoming plaintext read error» в чем может быть проблема ,не подключается к впну
Для андроида нужно tcp тунель, может из-за этого и не работает.
Приветствую. Благодарю за статью, все действительно просто, но после команды:
systemctl start openvpn@server
Выбивает ошибку:
Job for openvpn@server.service failed because the control process exited with error code.
See «systemctl status openvpn@server.service» and «journalctl -xe» for details.
После systemctl status openvpn@server.service:
● openvpn@server.service — OpenVPN connection to server
Loaded: loaded (/lib/systemd/system/openvpn@.service; disabled; vendor preset
: enabled)
Active: failed (Result: exit-code) since Fri 2018-09-28 00:36:44 U
TC; 1min 36s ago
Docs: man:openvpn(8)
https://community.openvpn.net/openvpn/wiki/Openvpn23ManPage
https://community.openvpn.net/openvpn/wiki/HOWTO
Process: 381 ExecStart=/usr/sbin/openvpn —daemon ovpn-server —status /run/op
envpn/server.status 10 —cd /etc/openvpn —config /etc/openvpn/server.conf —wri
tepid /run/openvpn/server.pid (code=exited, status=1/FAILURE)
Sep 28 00:36:44 111-111-111-129 systemd[1]: Starting OpenVPN connection to server
…
Sep 28 00:36:44 111-111-111-129 ovpn-server[381]: OpenVPN 2.4.0 x86_64-pc
-linux-gnu [SSL (OpenSSL)] [LZO] [LZ4] [EPOLL] [PKCS11] [MH/PKTINFO] [AEAD] buil
t on Jul 18 2017
Sep 28 00:36:44 *-*-*-129 ovpn-server[381]: library versions: OpenS
SL 1.0.2l 25 May 2017, LZO 2.08
Sep 28 00:36:44 *-*-*-129 ovpn-server[381]: daemon() failed or unsu
pported: Resource temporarily unavailable (errno=11)
Sep 28 00:36:44 *-*-*-129 ovpn-server[381]: Exiting due to fatal error
С юникс система не работал, поэтому полный нуб (( буду благодарен за помощь в решении проблемы!
Та можно проще, там пример был:
systemctl stop openvpn
systemctl start openvpn
ну или
systemctl restart openvpn
Добрый день! Вроде, делал все по инструкции, но файла с конфигурацией клиента на сервере не нашел (
Как быть? Где взять?
Посмотрите видео, может найдете косяк: Как бесплатно настроить свой VPN-сервер и подключить всех друзей к VPN Пошаговый план настройки VPN
Спасибо, нашел, в папке root оказался он. Я искал там же в openvpn. Все заработало.
Копирую файл с сервера командой scp root@23.23.23.23:~/macos-vpn-client.ovpn (ip для примера) , терминал отвечает: используйте
usage: scp [-12346BCpqrv] [-c cipher] [-F ssh_config] [-i identity_file]
[-l limit] [-o ssh_option] [-P port] [-S program]
[[user@]host1:]file1 … [[user@]host2:]file2
Что я не так делаю? К сожалению указанное видео не доступно
Скажите, а как можно добавить пользователя к openvpn с другим IP адресом ? Допустим есть сервер с двумя IP один во Франции, а другой в Нидерландах. Как сделать так, чтобы было два пользователя по вашей инструкции и у каждого свой IP ?
Чтобы с генерировать файл конфигурации для нового пользователя нужно еще раз запустить скрипт: sudo bash openvpn-install.sh
Но я все равно не очень понял, у вас два сервера и два пользователя, как они должны подключаться? случайным образом к одному из серверов?
Два момента не хватает здесь:
1) как отключить запись логов в VPN
2) сделать чтобы VPN не резал скорость. (допустим есть 50 мегабит через VPN — 10-15)
Ребят помогите, установил настроил по данной инструкции + подключил openvpn monitor, сделал сертификат запустили его на компе windows 10 прошло подключение все супер, но когда пытаемся подключится черет тотже самый радмин говорит что сервер не доступен…. пингуется все в две стороны, брандмауэр выключен антивируса нет.. в чем может быть проблема ? Также как зафиксировать за каждым статический ip адрес и запретить интернет от сервера openvpn что бы клиенты использовали свой интернет.
Добрый день,к впн подключаюсь,но дальше корпоративную сеть не видит, подскажите как настроить дальше.
Разобрался, не так нат настраивал)
Можно ли доработать скрипт для создания ключей с логином и паролем?
Спасибо тебе добрый человек))
Ребят подскажите где исправить IP адрес для внешнего подключения? при генерации клиентского сертификата, в сертификате указан локальный адрес его приходится менять на внешний постоянно.
ПОМОГИТЕ ))))
Настроил Openvpn по вашей статетье, работало все на УРА!!!
Появилось желание перенести его на другой сервак так как выпущено уже 300 слишним сертификатов.
Перенесли сервак все работает но ругается на RSA при генерации нового сертификата.
ОШИБКА :
Tell me a name for the client certificate.
Please, use one word only, no special characters.
Client name: lego
openvpn-install.sh: строка 74: ./easyrsa: Отказано в доступе
sed: невозможно прочитать /etc/openvpn/easy-rsa/pki/issued/lego.crt: Нет такого файла или каталога
cat: /etc/openvpn/easy-rsa/pki/private/lego.key: Нет такого файла или каталога
Client lego added, configuration is available at: /root/lego.ovpn
root@vpn:~#
Добрый день статья, Агонь но нужна помощь развернул тестовый стенд debian 9 сервер за nat с сети клиента пинг идет как родной, но я никак немогу попасть со стороны сервера, в клиентскую, скажите это рельно побороть, под виндой когда то делал подобное, и работало только немогу вспоснить в чм был затык, спасибо!
что можно сделать если местный провайдер заблокировал ip который дал впс сервер? дело в том что всё работало несколько дней и вдруг ip заблокирован, проверено программой WinMTR,
А как перенастроить скрипт, чтобы выдал все ключи и сертификаты отдельными файлами? У меня network-manager в Ubuntu 16.04 не хочет импортировать выданный ovpn. Вытаскиваю из ovpn ключи и сертификаты ручками — NM всё равно не принимает в таком виде.
нет такого файла «client.ovpn » потому команда client
cp client.ovpn /var/www/html/client.ovpn
не работает . Делал все по инструкции и видео.
А какие последствия использования этого скрипта? DH ключ например он поумолчанию как я понял у всех один и тот же. Есть ли риск что вы же и поламаете потом мою сеть?
ДифиХелмана используется при аутентификации, чтобы не проводить аутентификацию в открытом виде. Учите матчасть.
Здравствуйте Константин ! Подскажите пожалуйста если истек ssl ключ как создать новый и в коком месте настройках указать нового сертификата и ключа ?
Добрый день! Запустите еще раз скрпит для генерации файла конфигурации, он автоматически создаст новый файл конфигурации и в нем будет новый ключ. Далее новый файл конфигурации размещаете на клиенте, и будет счастье 🙂
Хорошо спасибо большое! А обмен пакетов по внутренней сети будут шифрованные или как?
весь трафик, который передается через впн, даже во внутренней сети, шифруется.
Последний вопрос. 🙂
Как можно проверить срок действия ssl сертификата? Если срок истекает то пакеты будут бегать не зашифрованным виде как я понял да?
Здравствуйте Константин ! Подскажите пожалуйста можно ли задать срок работы клиенским ключам? например 30 дней и ключ сам отключается
Добрый день, Константин! Спасибо за статью и видео, всё получилось с первого раза. Есть вопрос — я не могу принудительно поставить параметр cipher с AES-256-CBC на AES-128-CBC. Я менял в конфиге сервера в файле: /etc/openvpn/server/server.conf и, соответственно, в конфиге клиента, но в логах сервера при подключении клиента постоянно выскакивает надпись:
Sep 18 14:34:24 v335210 openvpn[1919]: rpi4/109.252.127.41:20641 Outgoing Data Channel: Cipher ‘AES-256-GCM’ initialized with 256 bit key
Sep 18 14:34:24 v335210 openvpn[1919]: rpi4/109.252.127.41:20641 Incoming Data Channel: Cipher ‘AES-256-GCM’ initialized with 25
Делал перезагрузку сервиса openvpn и просто перезагрузку сервера, ничего не помогает.
Цель: Хочу добиться чуть большей скорости, так как OpenVPN как клиент планирую запускать на Keenetic Giga, проц там слабоват.
Помогите советом, плиз. Заранее спасибо!
Приветствую.
Подскажите, почему пр первом запуске скрипта не выдает доп-настройки для ip ?
Не хочу по ip.
Хочу по имени vpn.domen.com например.
(а вот что у меня выдает: после приветствия, стразу на порт )
Welcome to this OpenVPN road warrior installer!
Which protocol should OpenVPN use?
1) UDP (recommended)
2) TCP
Protocol [1]:
IP-сервера указывается, потому что OpenVPN сервер открывает сокет для входящих соединений, сокет это IP:port, сокет может быть источника или назначения. На сервере вы указываете ip, но в файле конфигурации клиента можете прописать ваш домен vpn.domen.com, не забудь-те прописать соответствующий IP в настройках DNS и будет все работать. Но мое мнение что лучше по IP, DNS могут не всегда работать.
Добрый день.
Но не могу понять почему при настройке прописывается ip адрес а не имя сервера.
Так, и я хочу что бы в конфиге клиента указывался домен, но не ручками править после создания а сразу при создании.
А на счет «Но мое мнение что лучше по IP, DNS могут не всегда работать»
Так, а если сервер придется переносить, переделывать ну или ip менять так и у клиентов конфиги менять ? а если клиентом много ??? ручками менять это не выход!!!
Как сменить каталог, куда генерируется файлы клиентов? Он сейчас генерирует в папку root
Почему в статье указано что не редактируйте вручную файл конфигурации?
redirect-gateway и dhcp-option закомментировал в /etc/openvpn/server/server.conf пинг с клиентов пошел до 8.8.8.8 , но в браузере перестает работать интернет при подключении vpn
Привет! Что нужно донастроить, что бы при подключении к vpn, через него, пускал в домашню локальную сеть. Спасибо!
Всем здравия!
а как удалять клиента с помошью этого скрипта?
есть такое :
OpenVPN is already installed.
Select an option:
1) Add a new client
2) Revoke an existing client
3) Remove OpenVPN
4) Exit
Option: 2
Select the client to revoke:
но при 2) пересоздается сертификат
при 3) удаляется сам сервер
как удалить клиента и все его данные ???
Пункт 2 удаляет существующего клиента.
здравствуйте большое спасибо за статью все работает по скрипту как автомат.у меня просьба пожалуйста напишите как добавить монитор на openvpn server для мониторинга клиентов
Здраствуйте Константин !Во первых вам большой респект.И у меня возникает вопрос .Вот например я клиенту поставил на смартфон open через неделю ай-пи заблокировали и впн перестал работать .Я к примеру пробовал ставить доменное имя и все прекрасно работало но стоит заблокировать айпи и перестает работать.Может можно так я ставлю клиенту доменное имя и потом когда заблокируют айпи я могу поменять на это доменное имя новый айпи и клиенту не надо снова нести свой смартфон.С не терпением жду от вас ответа
здраствуйте Скажите пожалуйста возможно ли на опен сделать клиентам домен чтоб при блокировки можно поменять в домене айпи и у них все заработает
Добрый день
Инструкция супер все настроил на убунту.
Как изменить настройки установки чтоб можно было установить клиента на Микротике?
Нужен логин и пароль и сертификат и ключ.
Спасибо.
Добрый день. Всё заработало с пол пинка. Спасибо. Но есть два вопроса.
1. Через несколько дней нет возможности подключится. Клиент самой первой строкой выдаёт ошибку.
DEPRECATED OPTION: —cipher set to ‘AES-256-CBC’ but missing in —data-ciphers (AES-256-GCM:AES-128-GCM).
Future OpenVPN version will ignore —cipher for cipher negotiations.
Add ‘AES-256-CBC’ to —data-ciphers or change —cipher ‘AES-256-CBC’ to —data-ciphers-fallback ‘AES-256-CBC’ to silence this warning
2. Как прикрутить авторизацию через AD? По тем мануалам которые есть в сети, работать не хочет((((
Спасибо
С первым вопросом разобрался. Но как настроить авторизацию через AD никак не получается. Подскажите пожалуйста куда нужно копать. Спасибо
Здравствуйте. Провайдер блокирует DPI и OPENVPN не работает на UDP (клиент подключается но нет загрузки)как можно исправить это подскажите пожалуйста
/home/atix/Изображения/VPN.png По видимому тут у Вас прописана старая версия VPN.
На Debian 11 не устанавливается. Как быть?
Привет Всем!
Спасибо за статью Константин!!!
Давно пользуюсь этим скриптом.
Вопрос как мониторить какие пользователи активны? а каких сто лет как нет уже?
Спасибо за внмание! 🙂
Как устоновить сначало когда заходишь программу
А если у меня стоит ISP Manager, который работает через Cloudflare, VPN сервер не помешает работе?
p p
22 часа назад
@Cisco Ne Slabo / SEDICOMM TV и еще я нашел у вас ошибку во втором слове команды в команде на сайте
vim /ectc/apache2/sites-available/000-default.conf
Ответить
p p
p p
1 час назад (изменено)
@Cisco Ne Slabo / SEDICOMM TV
подскажите пожалуйста
1)установил опенвпн на сервер дебиан11 (ваш скрипт отработал без ошибок)
2)поместил конфиг клиента на тот же сервер дебиан11
3)с этого же сервера дебиан11 пытаюсь зайти в интернет, но мой айпи не изменяется.
-служба ВПН запущена
-НО адрес сервакаВПН не пингуется!
в чем может быть дело? и возможно ли вообще ,чтобы мой клиент впн находился на машине-сервере впн и заходить в интернет по впн с этой машины?
-служба ВПН запущена
-адрес 10.128.0.5 пингуется
-в активных сетевых устр-вах вижу eth0 и lo
eth0: flags=4163 mtu 1500
inet 10.128.0.5 netmask 255.255.255.0 broadcast 10.128.0.255
inet6 fe80::d20d:1eff:fee4:57b8 prefixlen 64 scopeid 0x20
ether d0:0d:1e:e4:57:b8 txqueuelen 1000 (Ethernet)
RX packets 4863 bytes 677154 (661.2 KiB)
RX errors 0 dropped 0 overruns 0 frame 0
TX packets 4369 bytes 636698 (621.7 KiB)
TX errors 0 dropped 0 overruns 0 carrier 0 collisions 0
lo: flags=73 mtu 65536
inet 127.0.0.1 netmask 255.0.0.0
inet6 ::1 prefixlen 128 scopeid 0x10
loop txqueuelen 1000 (Local Loopback)
RX packets 10 bytes 660 (660.0 B)
RX errors 0 dropped 0 overruns 0 frame 0
TX packets 10 bytes 660 (660.0 B)
TX errors 0 dropped 0 overruns 0 carrier 0 collisions 0
root@vm-debian-moiseev:/home/moiseevpa# netstat -rn
Kernel IP routing table
Destination Gateway Genmask Flags MSS Window irtt Iface
0.0.0.0 10.128.0.1 0.0.0.0 UG 0 0 0 eth0
10.128.0.0 0.0.0.0 255.255.255.0 U 0 0 0 eth0
такая же петрушка
А как удалить или переустановить сервер?
Запустить еще раз скрпит, там будет меню.
И еще такой вопрос, постоянно гугл определяет откуда я, независимо от того, какой я днс выбираю. Как это можно исправить?
Спасибо!
Здравствуйте. Openvpn ставил по вашей инструкции всё прекрасно работает. Сейчас появилась необходимость перенаправить трафик на другой сетевой интерфейс.
Клиенты подключаться по белому ip к серверу через сетевой интерфейс enp9s0 нужно чтоб сервер давал интернет клиентам с интерфейса wlp5s0b1.
enp9s0: flags=4163 mtu 1500
inet 212.109.13.7 netmask 255.255.255.0 broadcast 212.109.13.255
inet6 fe80::ea11:32ff:fe11:569a prefixlen 64 scopeid 0x20
ether e8:11:32:11:56:9a txqueuelen 1000 (Ethernet)
RX packets 465 bytes 38594 (38.5 KB)
RX errors 0 dropped 0 overruns 0 frame 0
TX packets 104 bytes 17706 (17.7 KB)
TX errors 0 dropped 0 overruns 0 carrier 0 collisions 0
device interrupt 18
lo: flags=73 mtu 65536
inet 127.0.0.1 netmask 255.0.0.0
inet6 ::1 prefixlen 128 scopeid 0x10
loop txqueuelen 1000 (Local Loopback)
RX packets 80 bytes 5920 (5.9 KB)
RX errors 0 dropped 0 overruns 0 frame 0
TX packets 80 bytes 5920 (5.9 KB)
TX errors 0 dropped 0 overruns 0 carrier 0 collisions 0
tun0: flags=4305 mtu 1500
inet 10.8.0.1 netmask 255.255.255.0 destination 10.8.0.1
inet6 fe80::b0b7:2af9:1d31:7f2a prefixlen 64 scopeid 0x20
unspec 00-00-00-00-00-00-00-00-00-00-00-00-00-00-00-00 txqueuelen 500 (UNSPEC)
RX packets 0 bytes 0 (0.0 B)
RX errors 0 dropped 0 overruns 0 frame 0
TX packets 7 bytes 336 (336.0 B)
TX errors 0 dropped 0 overruns 0 carrier 0 collisions 0
wlp5s0b1: flags=4163 mtu 1500
inet 192.168.1.100 netmask 255.255.255.0 broadcast 192.168.1.255
inet6 fe80::fdbc:a001:50e3:d0de prefixlen 64 scopeid 0x20
ether 4c:ed:de:f7:bc:73 txqueuelen 1000 (Ethernet)
RX packets 267 bytes 61140 (61.1 KB)
RX errors 0 dropped 145 overruns 0 frame 0
TX packets 18 bytes 1943 (1.9 KB)
TX errors 0 dropped 0 overruns 0 carrier 0 collisions 0
Пробовал так:
echo ‘150 vpn.out’ >> /etc/iproute2/rt_tables
ip rule add from 10.8.0.0/24 table vpn.out
ip route add default dev wlp5s0b1 table vpn.out
По итогу клиент подключается к серверу но интернета нет.
В линуксе новичок. Буду очень благодарен за любую помощь.
доброго времени суток.
Подскажите пожалуйста что и где поправить для того чтобы MikroTik мог подключаться к ovpn.
Скажите пожалуйста, в 2024 году это все работает? Делаю все по видео, пишет после команды bash openvpn-install.sh — что якобы Ubuntu устарело… Как быть? У меня такой сервер Ubuntu 20.04 LTS (ENG)
Добрый день, переходим на другую сеть, подскажите как на сервере open vpn, сменить ip, маску , шлюз, днс настройки? Заранее спасибо!
Добрый день! Спасибо за ролик. Все понятно и доступно!
Есть вопрос. Нет ли у Вас видео где Вы так же объясняете как настроить vpn на vps сервере. Но что бы подключиться к нему можно было не через OpenVPN. А через роутер.
Не могу ни как найти таких инструкций. Хочу настроить VPN на роутере Xiaomi_6AA0. Что бы все устройства в сети сразу работали через VPN.
Надеюсь я правильно донес свою мысли. Спасибо!
Подскажите в чем может быть проблема. По инструкции VPN работает, но у клиентов нет интернета. Вот таблица маршрутизации:
root@ownvpskr:~# netstat -rn
Kernel IP routing table
Destination Gateway Genmask Flags MSS Window irtt Iface
0.0.0.0 78.111.75.1 0.0.0.0 UG 0 0 0 ens18
8.8.4.4 78.111.75.1 255.255.255.255 UGH 0 0 0 ens18
8.8.8.8 78.111.75.1 255.255.255.255 UGH 0 0 0 ens18
10.8.0.0 0.0.0.0 255.255.255.0 U 0 0 0 tun0
78.111.75.0 0.0.0.0 255.255.255.0 U 0 0 0 ens18
78.111.75.1 0.0.0.0 255.255.255.255 UH 0 0 0 ens18
root@ownvpskr:~#
Что не так?
Добрый день. спасибо за статью, всё чётко и понятно.
У меня только возникла другая проблема, я не имею права root и как бы я не пробовал, у меня не получается вытащить с папки root файл конфигурации. Скажите пожалуйста, можно как то поменять путь сохранения файла конфигурации при его создании? Спасибо заранее
Добрый день! Сделал все по инструкции все работает установил client-01.ovpn в роутер и все кто подключаются к роутеру защищены т.е. есть впн, но есть нюанс скорость интернета режет фактическая 300 мб а с впн 10-15 мб есть лечение? Спасибо за ясную инструкцию!
Ребет всем добра, подскажите пожалуйса, поднял сервак все огонь работает, но тут ситуация такая, есть условно сервер и 10 клиентов, нужно выдать каждому конфиг но при подключении они должны использовать свой интернет а не openvpn, openvpn им нужен только для подключения к серверу, подскажите пожалуйста как это организовать ?